With the launch of the integration, users now have the ability to create automation between The VECTOR™ Estimator and FOUNDATION.
As you build your estimate, every line item is assigned a cost code and cost class so there is no need for accounting to manually add jobs and budget data.
Once the estimate is complete, the project budget and contract amount appear, and accounting can drill down to any item!
Contacting Support
VECTOR
(844) 334 3378
[email protected]
https://www.vectortakeoff.com/support/
FOUNDATION
(800) 811 5926
[email protected]
https://www.foundationsoft.com/clients/
Connecting and Syncing VECTOR and FOUNDATION
To proceed with the integration, FOUNDATION credentials must be verified, and the database values must be synced over to VECTOR.
Requesting API Access from FOUNDATION
To connect a FOUNDATION account to VECTOR, it is required for all users to submit a request for API access as well as a unique username and password. This login is different from the username and password used to login to FOUNDATION.
- Go to the FOUNDATION client portal website: https://clients.foundationsoft.com
- Login with your FOUNDATION client portal credentials.
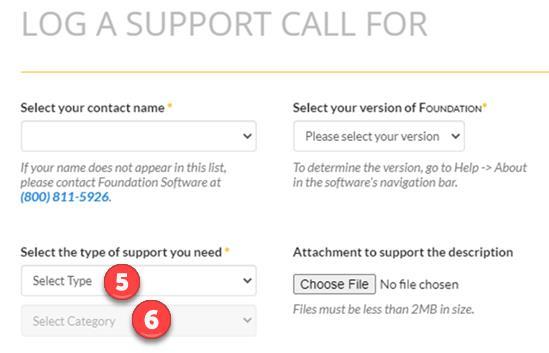
- Click the Log A Support Call option on the right side of the header.
- Fill out all required fields.
- Under the Select type dropdown menu, select “Integrations”.
- Under the Select Category dropdown menu, select “API Access”.
- Click [Submit].
- The ticket is routed to our technical team, who will reach out with the required credentials for API access.

Connecting VECTOR with FOUNDATION
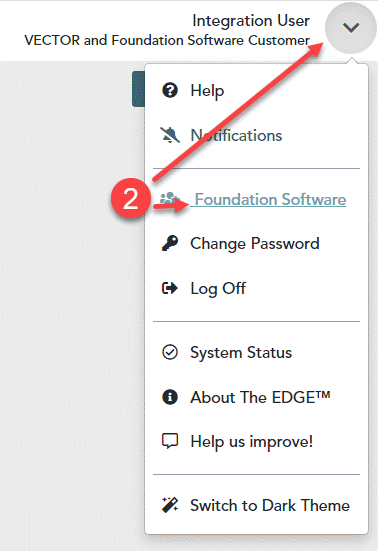
- Log in to the administrator portal at https://admin.edgeestimator.com
- In the upper right corner, expand the menu by clicking the down arrow. Click on FOUNDATION Software.

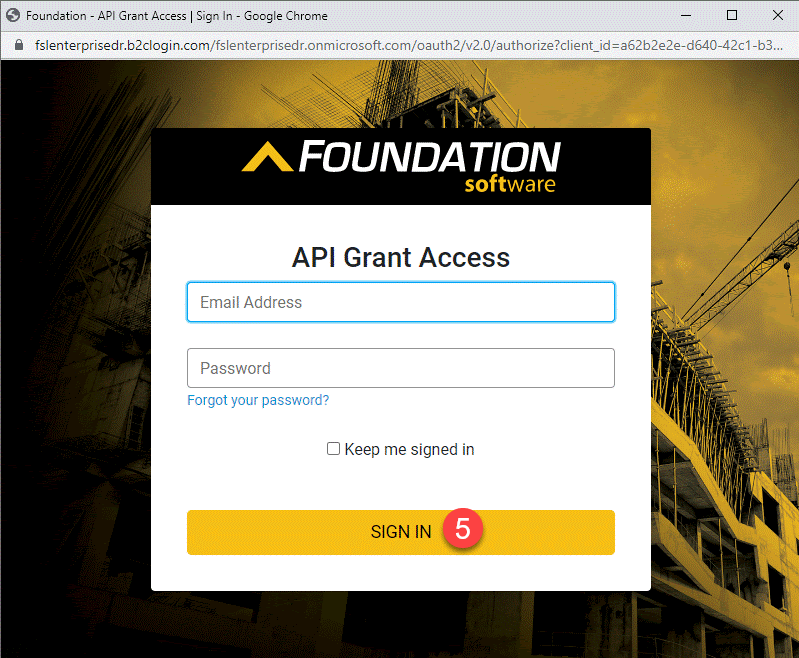
- The FOUNDATION Software Landing Page screen opens. If your FOUNDATION account is not currently connected, a notification appears at the top of the window.
- Click on the hyperlinked “here” in the notification.

- The FOUNDATION API Grant Access window opens. Enter your FOUNDATION API credentials and click [Sign In]. If you successfully sign in, the window automatically closes.
Note: Your FOUNDATION connection is valid for 24 hours.


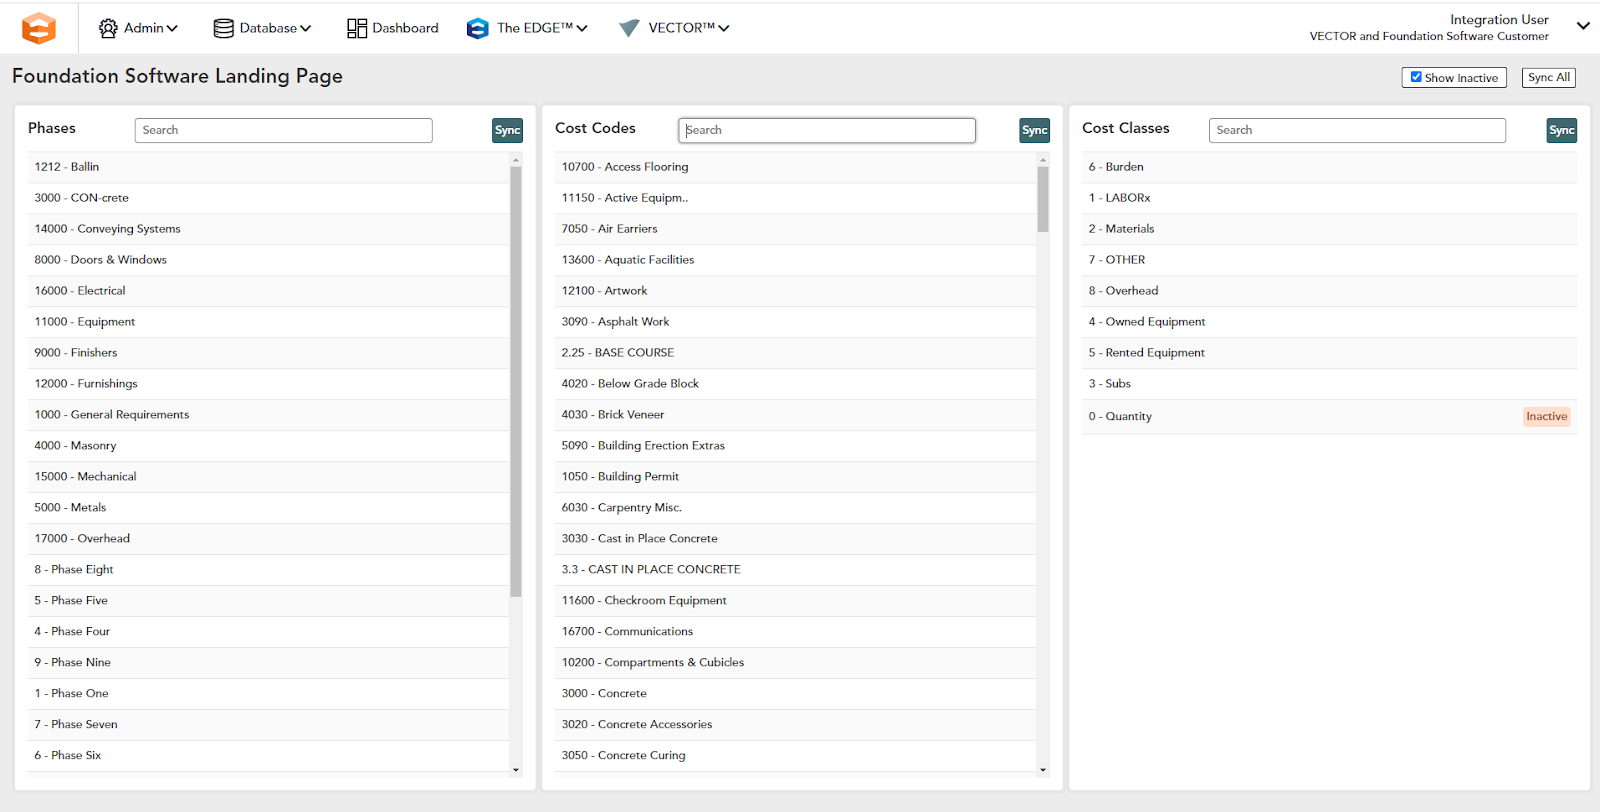
Syncing Phases, Cost Codes, and Cost Classes
The VECTOR FOUNDATION integration allows you to easily import cost codes and cost classes from FOUNDATION into VECTOR. If you utilize phases, you can also bring them over to The EDGE Estimator.
You cannot manually add, modify, or delete phases, cost codes, and cost classes synced from FOUNDATION . The only way to add, modify, or delete a phase, cost code, or cost class is to do so in FOUNDATION, then sync to The EDGE Estimator.
The FOUNDATION Software Landing Page only contains phases, cost codes, and cost classes imported from FOUNDATION.
- To sync either phases, cost codes, or cost classes, click the [Sync] buttons in their respective tiles. To sync all of them, click the [Sync All] button in the upper right.

- The window populates with all phases, cost codes, and/or cost classes currently active in FOUNDATION.
Note: If you delete an item in FOUNDATION that was previously synced to VECTOR, it still appears in the FOUNDATION Software Landing Page. However, it appears marked as “inactive.”


Working Inside VECTOR
Now that the account is connected and phases, cost codes and cost classes are synced, we can start incorporating them into our database and estimate.
Incorporating your Imported Data into VECTOR Database
By adding cost codes and cost classes to items in the database, those items appear with a default cost code and cost class whenever used in future estimates.
Adding cost codes and cost classes at the database level – for individual items
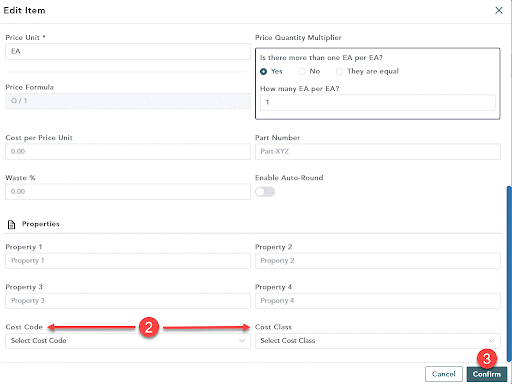
- Open the item manager. To the right of the item you want to add a cost code/cost class for, click the Edit icon.

- The Edit Item window opens. Scroll to the Properties section. You will see a field for cost code and a field for cost class.
- After selecting a cost code and/or cost class, click [Confirm].


Adding cost codes and cost classes at the database level – for multiple items
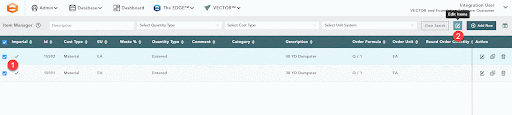
- Open the item manager. Enable the checkboxes to the left of the items you want to assign cost codes and/or cost classes for.
- Click the Edit Items icon.

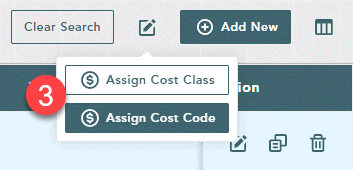
Click either [Assign Cost Class] or [Assign Cost Code].
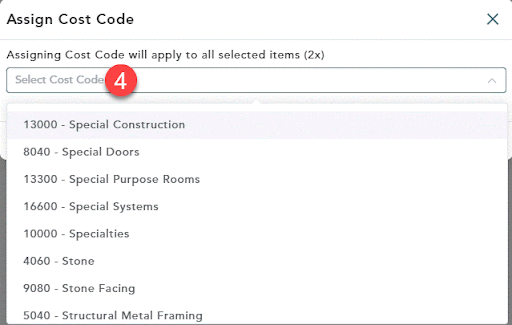
- A screen opens containing a dropdown. Enter the cost code or cost class you want to assign.

- Click [Confirm].
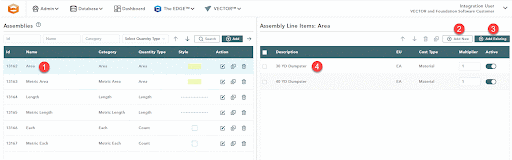
Adding cost codes and cost classes in the assembly manager
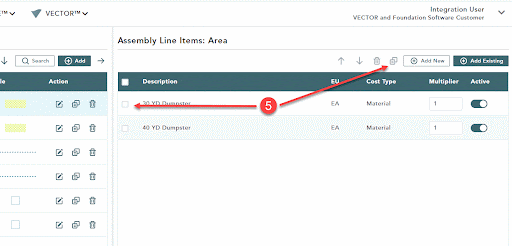
- Open the assembly manager. Click on an assembly to open its line items in the Assembly Line Items window on the right.
- To add an existing item to which you have assigned a cost code and cost class, click [+ Add Existing].
- To add a new item, click [+ Add New]. You can then add a cost code or cost class in the Edit Item window that appears.
- To edit an existing item and add a cost code or cost class to it, click on the item. Then, add a cost code or cost class in the Edit Item window that appears.

- You can also copy an item by enabling its checkbox, then clicking the Copy icon at the top. You can then add a cost code or cost class in the Edit Item window.

Incorporating your Imported Data into VECTOR Estimates
Learn how to add phases, cost codes, and cost classes at the VECTOR job level. Job level changes are valid for the current job only.
Assigning a phase to a section
If you utilized phases in Foundation, this section applies to you. Note that assigning phases is not required.
If your company does not use phases, skip the instructions below. All budget data will appear in Foundation with the default phase “1.”
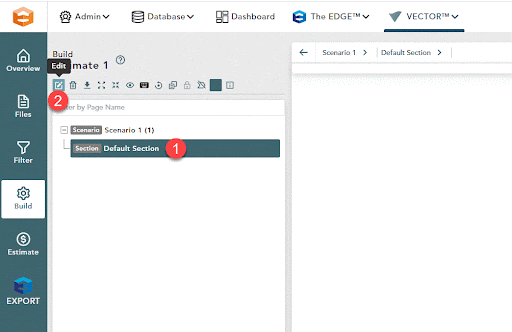
- Open your bid. In the Build screen, click on a section.
- Click the Edit icon.

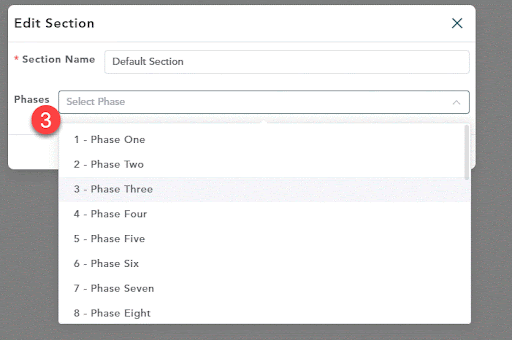
- The Edit Section window opens. In the Phases dropdown, you will see all the phases you imported in your most recent sync. Select the phase you want to assign to this section.

- Click [Save].
Adding cost codes and cost classes in the build screen
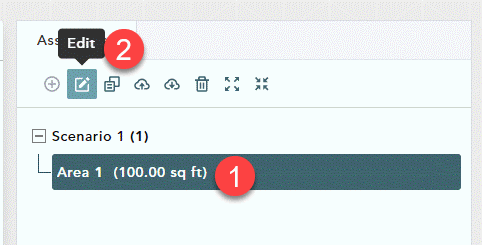
- Open your bid. In the Build screen, click on a scenario assembly to select it.
- Click the Edit icon.

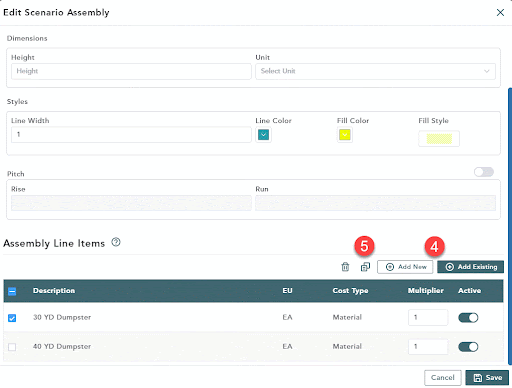
- The Edit Scenario Assembly window opens.
- In the Assembly Line Items section, either click [+ Add New] to create a new assembly or click [+ Add Existing] to select an existing assembly.
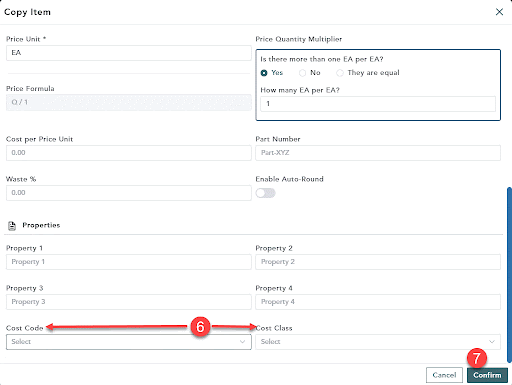
- Click the Copy icon.

- The Copy Item screen opens. In the Properties section at the bottom, select a cost code and cost class.
- Click [Confirm].

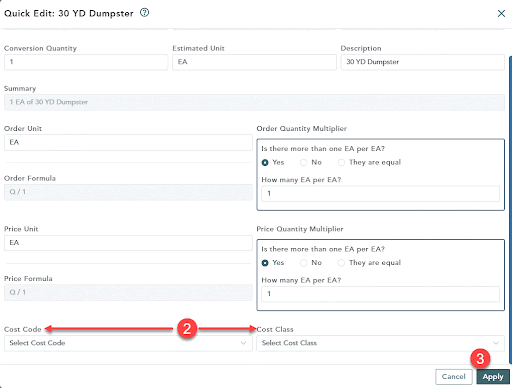
Adding cost codes and cost classes to estimates – individual
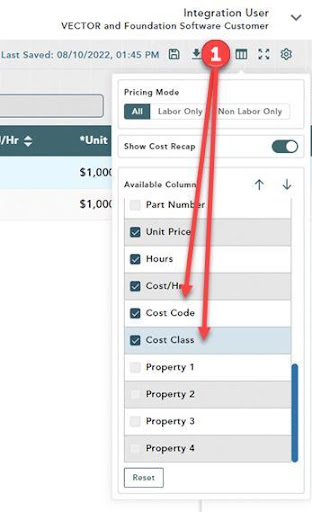
- To visualize a list of cost codes and/or cost classes for your job items, click the Columns icon to enable the appropriate checkboxes.
- Open your estimate. Click on an item’s description to open its Quick Edit screen.
- You will see fields for the cost code and cost class near the bottom.
- After selecting a cost code and/or cost class, click [Apply].

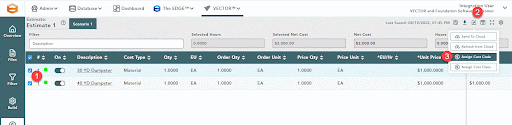
Adding cost codes and cost classes to estimates – multiple
You can follow similar steps here as when you added cost codes and cost classes at the database level in the item manager.
- Open your estimate. Enable the checkboxes to the left of the items you want to assign cost codes and/or cost classes for.
- Click the Edit Items icon.
- Click either [Assign Cost Class] or [Assign Cost Code].

- A screen opens containing a dropdown. Enter the cost code or cost class you want to assign.
- Click [Confirm].
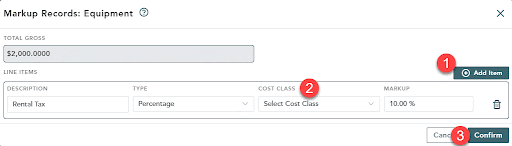
Assigning cost classes to markups
Only cost type markups can be assigned a cost class. Cost type markups are any markups added within the Material, Labor, Subcontract, Equipment, or other screens.
- Open your estimate. Click on its Cost Type.
- The Markup Record window opens. Click [+ Add Item] to add a markup.
- In the Cost Class column, select your cost class. The dropdown should contain all the cost classes you imported from Foundation.
- Click [Confirm].

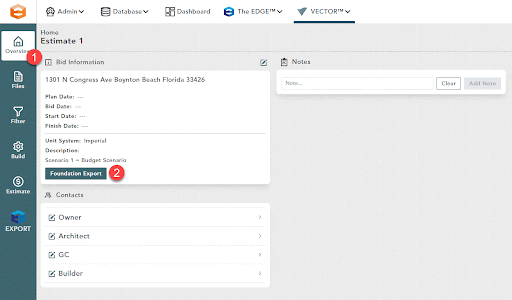
Exporting your Estimates to Foundation
Learn how to export a job from VECTOR to Foundation from the administration portal, allowing non-estimating personnel to export jobs easily.
Exporting an Estimate to Foundation
- Open your estimate. In the side bar, click Overview.
- Click the [Foundation Export] button.
Note: if your Foundation account is not currently connected, clicking this button prompts the Foundation sign-in window to appear.
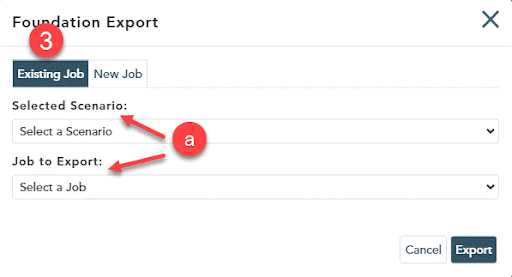
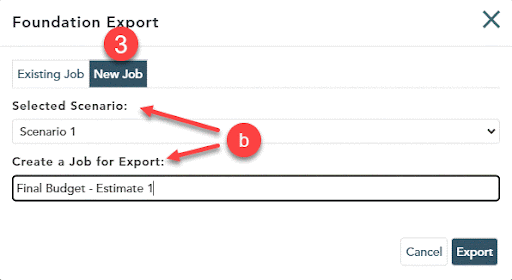
- The Foundation Export screen opens. Click [Existing Job] if you want to send a budget update to an existing Foundation job. Click [New Job] if you would like to create a new job in Foundation with your exported budget.
- If you selected [Existing Job], select your VECTOR scenario from the Selected Scenario dropdown and your Foundation job from the Job to Export dropdown.

- If you selected [New Job], select your VECTOR scenario from the Selected Scenario dropdown and enter your new Foundation job’s title.
Note: When Foundation receives the job, a job number is automatically created using Foundation’s job number increment functionality.

- If you selected [Existing Job], select your VECTOR scenario from the Selected Scenario dropdown and your Foundation job from the Job to Export dropdown.
- Click [Export].
Working with Your Exported Estimates in Foundation
After exporting a job from the administration portal, accounting personnel can verify the job and its budget for validity.
Enabling Validate Third-Party Jobs
Before you can import any third-party job, you need to validate them in Foundation. Follow the steps below to enable this feature within Foundation.
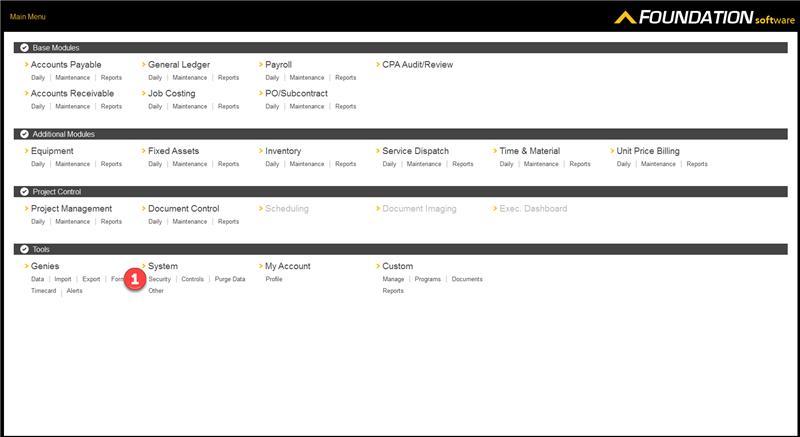
- From the main menu, navigate to Tools > System > Security
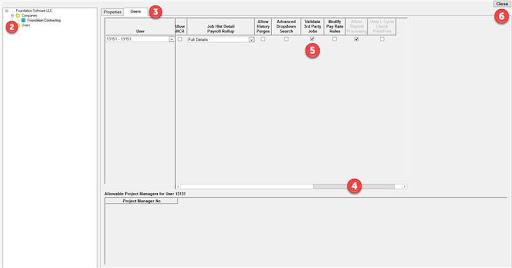
- Expand Companies > Company Name.
- Click the “Users” tab
- Scroll to find the Validate 3rd Party Jobs column.
- Check box to enable functionality for the desired users.
- Hit [Close]


Validating Third-Party Jobs
See how to utilize the Validate 3rd Party Jobs functionality below and finalize a new job import from VECTOR.
- Navigate to the Jobs “General” tab from the main menu (Job Costing > Maintenance > Jobs).
- Click on the [Validate 3rd Party Jobs] button.
- The New Job Validation screen opens. Enable the checkbox next to the VECTOR job you exported.
- Click [Validate].
- The job will not be fully validated until you click [OK] in the Jobs screen. Before clicking [OK], however, you might want to verify all the budget information you imported in from VECTOR. The next section goes through key fields to check for in the Jobs screen.
Verifying the Information Imported from VECTOR
This integration’s purpose is for adding new jobs into Foundation and should not be used for change orders. Foundation has change order functionality, but it is not integrated with VECTOR at this time.
Exporting to existing jobs is possible, but potentially dangerous and should only be done in certain situations. Please reach out to a support representative before doing so. Best practice is to always export a new job, even if only slight adjustments are needed to a previous export. You can always clean up old jobs from your Foundation database.
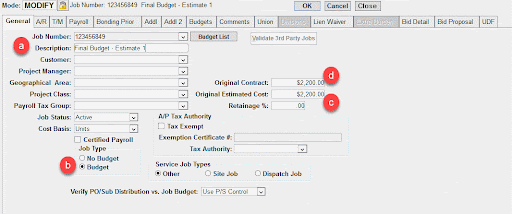
- In the Jobs “General” tab (Job Costing > Maintenance > Jobs), you will see a few things:
- The Description matches what you entered in VECTOR.
- The Job Type is marked as a “Budget.”
- The Original Estimated Cost is the net cost, plus markups, from VECTOR.
- The Original Contract is the total contract amount, plus any overhead or profit markups, from VECTOR.

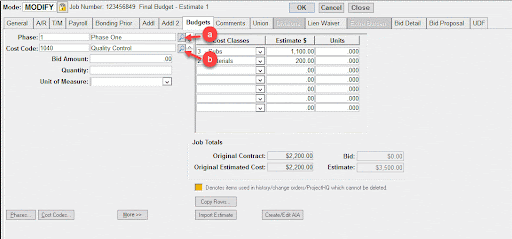
- In the Jobs “Budgets” tab, you see a few things:
- Clicking the magnifying glass next to the Phase fields opens a window with all phases in the budget. If no phases were used in The EDGE Estimator, the default phase appears here.
- Clicking the magnifying glass next to the Cost Code fields opens a window with

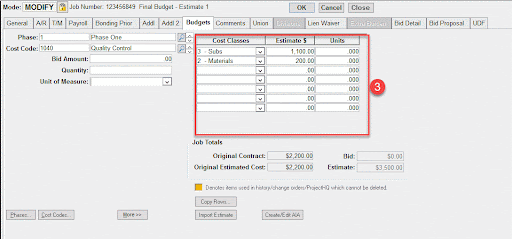
- In the right-hand side of the Jobs screen, all cost classes are grouped by their respective cost codes.
- Any markup given its own cost class different from other job items displays as such.
- For any markups that were assigned a cost class matching that of other items, VECTOR checks what items the markup applies to. That markup’s dollar amount is displayed under the same cost class as the other items.
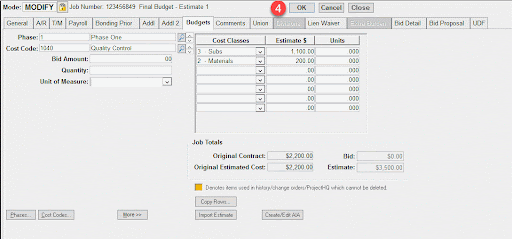
- Click [OK] to validate the job and the budget.
- A window appears confirming the validation.